Setting up a Local Network with NCTL
NCTL stands for network/node control. NCTL is a CLI application you can use to set up and control multiple local Casper nodes during development. Many developers wish to spin up relatively small test networks to localize their testing before deploying to the blockchain. Adopting a standardized approach in the community is also helpful for troubleshooting and reporting issues.
Prerequisites
- You have completed the Getting Started section, which shows you how to install your development environment, including tools like CMake (version 3.1.4+), Cargo, and Rust.
- Make sure you have Python 3 installed if your operating system does not include Python.
- To run NCTL, you will also need the bash shell.
Video Tutorial
If you prefer a video walkthrough of this guide, you can check out this video.
Installing a Virtual Environment
We will show you how to run NCTL in a virtual environment. If you want to run NCTL at the system level, you can, but we recommend that you only do that if you are sure you know what you are doing.
First, you will need to install a set of tools required for running NCTL.
Step 1. The first tool you will need is pip, a package manager for Python. Pip comes with the Python 3 installation from python.org, but if you do not have it already, follow the steps below or the full installation instructions.
Instructions for MacOS:
curl https://bootstrap.pypa.io/get-pip.py -o get-pip.py
python3 get-pip.py
Instructions for Linux:
sudo apt install python3-pip
Step 2. Install pkg-config, a program used to compile and link against one or more libraries.
Instructions for MacOS:
brew install pkg-config
Instructions for Linux:
sudo apt install pkg-config
Step 3. Install either libssl-dev (Linux) or openssl (MacOS), which are toolkits for the Transport Layer Security (TLS) and Secure Sockets Layer (SSL) protocols. They also serve as general-purpose cryptography libraries.
Instructions for MacOS:
brew install openssl
Instructions for Linux:
sudo apt install libssl-dev
Step 4. You will also need the gcc and g++ compilers, which usually come as part of developer command-line tools (versions 7.5.0 at the time of this writing).
Instructions for MacOS:
xcode-select --install
gcc --version
g++ --version
Instructions for Linux:
sudo apt install build-essential
gcc --version
g++ --version
Important Note:
The following commands need to be executed within the Bash shell. While MacOS and some Linux distributions use Zsh by default, they also include Bash. To ensure proper execution of the subsequent commands, switching to Bash is recommended. If the command does not work, please refer to the Bash documentation on how to install it on your system.
Step 5. Switching to Bash Shell:
Type the following command in your terminal:
Instructions for MacOS and Linux:
bash
This will launch a new Bash shell session. You can then proceed with the tutorial.
Step 6. Create and activate a new virtual environment. Commands applicable to the virtual environment will be prefixed with (env). Run the following commands to set it up.
Instructions for MacOS and Linux:
python3 -m venv env
source env/bin/activate
Once you have activated the virtual environment, your terminal prompt will change to indicate you're working within it. It will usually look something like this:
(env) $ // This line is for visual representation only, not to be copied
Step 7. Inside the virtual environment, upgrade pip to the latest version.
Instructions for MacOS and Linux:
pip install --upgrade pip
Step 8. Install jq, a command-line JSON processor.
Instructions for MacOS and Linux:
pip install jq
Step 9. Install supervisor, a cross-platform process manager.
Instructions for MacOS and Linux:
pip install supervisor
Step 10. Install toml, a configuration file parser.
Instructions for MacOS and Linux:
pip install toml
Setting up the Network
You are now ready to set up and run your local network of Casper nodes.
Step 11. Clone the casper-node-launcher software in your working directory, which we will call WORKING_DIRECTORY. Very Important!!! Choose a short path for your working directory; otherwise, the NCTL tool will report that the path is too long.
Instructions for MacOS and Linux:
cd <WORKING_DIRECTORY>
git clone https://github.com/casper-network/casper-node-launcher
Assuming you have set up a small local network, you can speed up the process of creating new blocks with NCTL by reducing the deploy_delay in your local config.toml before running nctl-assets-setup.
Step 12. Next, clone the casper-node software, also in your working directory.
Instructions for MacOS and Linux:
git clone https://github.com/casper-network/casper-node
Step 13. Finally, clone the casper-client-rs software in your working directory.
Instructions for MacOS and Linux:
git clone https://github.com/casper-ecosystem/casper-client-rs
Step 14. Activate the NCTL environment with the following command.
Instructions for MacOS and Linux:
source casper-node/utils/nctl/activate
Step 15. Compile the NCTL binary scripts. The following command compiles both the casper-node and the casper-client in release mode.
Instructions for MacOS and Linux:
nctl-compile
The compilation takes some time, so it might be a perfect moment to get some coffee.
Step 16. Set up all the assets required to run a local network, including binaries, chainspec, config, faucet, and keys. Also, spin up the network right after. The default network will have 10 nodes, with 5 active nodes and 5 inactive nodes.
Instructions for MacOS and Linux:
nctl-assets-setup && nctl-start
Once a network is up and running, you can control each node within the network and add new nodes to the network.
Several other NCTL commands are available via aliases for execution from within a terminal session. All such commands are prefixed by nctl- and allow you to perform various tasks.
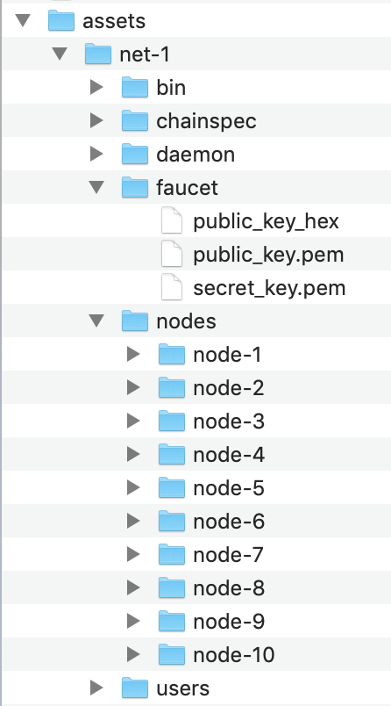
You should see the new directory utils/nctl/assets, with the following structure.

Here is the command line output you would expect.

Stopping the Network
Step 17. Although not necessary, you can stop and clean the NCTL setup with the following commands.
Instructions for MacOS and Linux:
nctl-stop
nctl-clean
Next Steps
- Explore the various NCTL commands.
- Explore the NCTL usage guide.